

|
|
|
|
Harley Hahn's
File Sharing
Le petit guide
Master List |
HARLEY HAHN'S USENET CENTER File Sharing
Usenet is one of the most dependable ways for you to share files. To do so, all you have to do is upload the file you want to share, and it will be propagated automatically. Within a short time, your file will be available, for free, to people around the world. When you upload a file in this way, we say that you POST the file. Almost all the files posted to Usenet are binary files, many of them large binary files. Nevertheless, Usenet was not designed to share such files, so a lot of detailed processing has to be done behind the scenes. For this reason, uploading binary files is a complex undertaking. Although almost all of the work is done by special programs, which you can get for free, you do have to learn how to use those programs, which can be a bit confusing at first. I wrote this Quick Guide to make it easy for you to post (upload) binary files to Usenet. All you have to do is follow the steps described below, one a time. To help you, I have included a lot of screenshots, with comments and instructions. Although the procedures may look complicated, you will find them to be quite easy once you have uploaded one of two files of your own. Note to New Users Within this Quick Guide, I assume you are an experienced Usenet user who understands the basic ideas of Usenet file sharing. For this reason, I have structured this guide as a reference, with is little explanation as possible. If you are not an experienced user, or if you want a fuller, more detailed explanation, I suggest you start by reading the File Sharing Tutorial. This free tutorial explains all the basic concepts you need to know to to upload and download files with Usenet: Once you know what you are doing, you can come back to this Quick Guide, and use it as a reference whenever you want to upload a file.
|
|||||||||||||||||||||||||||
|
Summary of Uploading Procedures
|
To prepare to upload a file, create a folder (directory) to hold your work files. To start, the file sharing folder will hold only the file you want to upload. Our example uses a file named steal-this-film-2.avi in the folder C:\file-sharing. 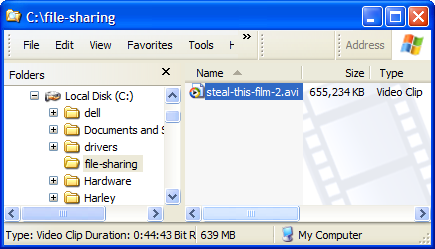
The first step in uploading a large binary file is to compress the file and break it into pieces. The program that is used most widely is WinRAR, which produces compressed files called RAR files. WinRAR download site: http://www.rarlabs.com/download.htm Start WinRAR. Navigate to the folder that contains the file you want to share. Select it, and click the Add button: 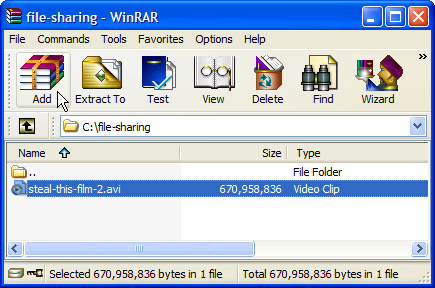
You will now see a window to specify the compression settings. 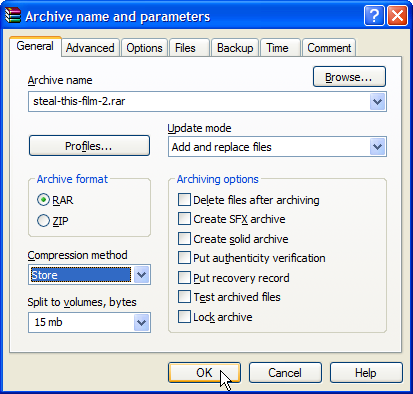
Compression method: "Store" if the file is already compressed; "Normal" if it is not compressed. Split to volumes, bytes: Use the table below.
Note: By default, WinRAR assumes that any number you type by itself refers to kilobytes. Thus, you must specify "mb" for megabytes. Click the OK button. WinRAR will begin to compress and split the file. You will see a window, similar to the one below, showing the progress. 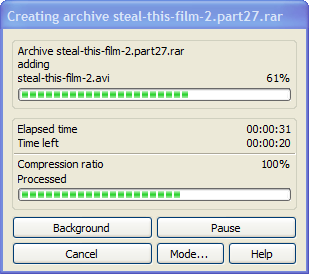
Once the processing is finished, you will have multiple RAR files in the folder. Notice the original file at the top of the list. 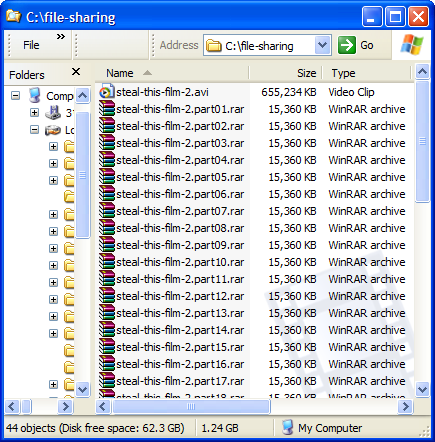
There are a variety of programs you can use to create an SFV (checksum) file. The one I recommend is QuickSFV. It is free, works quickly, and is easy to use.
QuickSFV download site: To generate an SFV file, open your file manager (Windows Explorer), navigate to the your file sharing folder, and select all the RAR files. Be sure that you do not select the original file (in this case, the AVI file). Right-click on the selected files. You will see the standard context menu. Click on Create .SFV file. 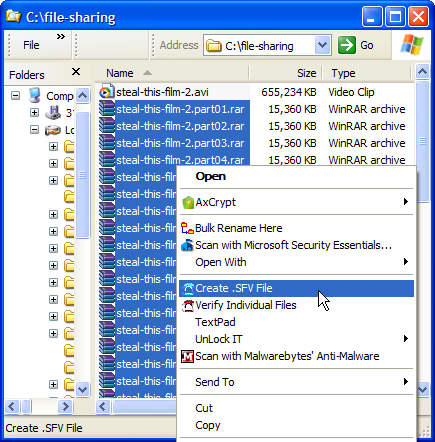
Before QuickSFV starts to work, it will display a window showing you the name of the SFV file it is about to create. The default is the filename of the first file in the set, with an extension of sfv. 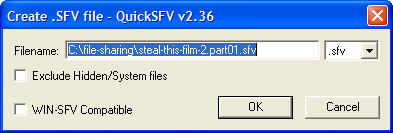
The best name to use is the filename of the original file, not the name of a RAR file. So take a moment to edit the filename by deleting the superfluous characters (in this case, .part01). Then click the OK button. 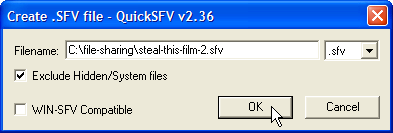
You can watch as QuickSFV processes each file: 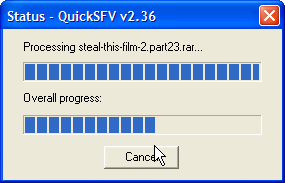
Once QuickSFV is finished, you will see the newly created SFV file in your folder. At this point, before you upload anything, you should take a moment to test the file. To do so, simply double-click on it. 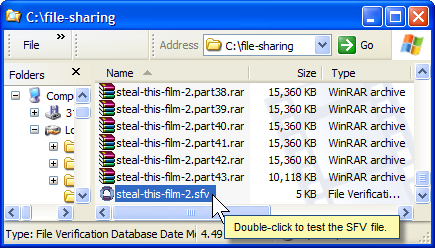
In the screenshot below, you can see the results of such a test using the SFV file we just generated: all the checksums match up correctly. 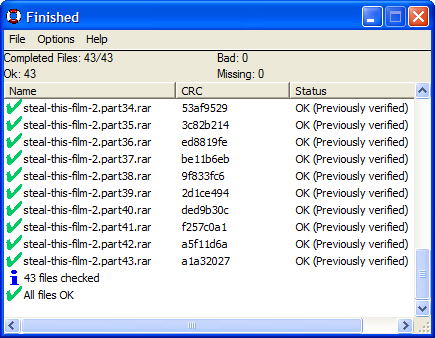
To generate PAR2 (error correction) files, I recommend a freeware program called QuickPar.
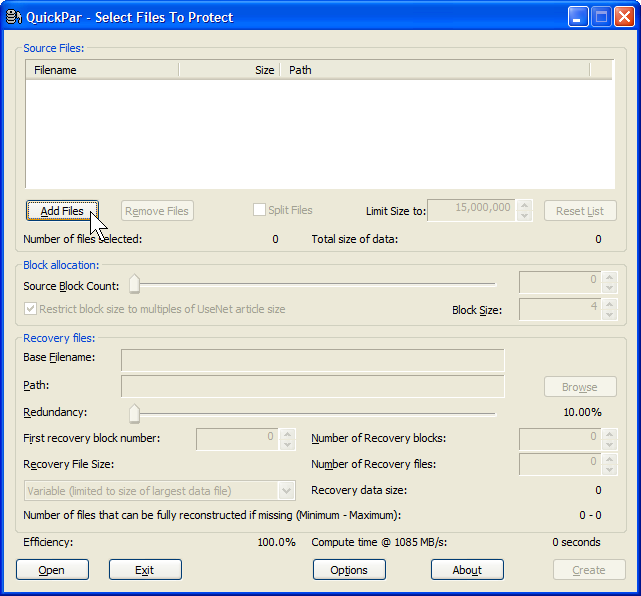
QuickPar download site: When you start QuickPar, you will see a window like the one below. The first thing you must do is select the data files you want to process. Start by clicking the Add Files button. |
|||||||||||||||||||||||||||
|
||||||||||||||||||||||||||||
|
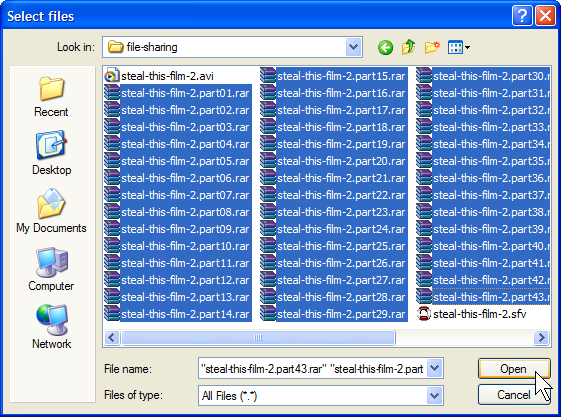
You will now see the window below which is used to select the files for which you want to create PAR2 data recovery files. Navigate to the folder that contains the files to be uploaded. Select only the RAR files, then click the Open button. Do not select the original file (in this case, the avi file) or any other files (such as the sfv file). |
||||||||||||||||||||||||||||
|
||||||||||||||||||||||||||||
|
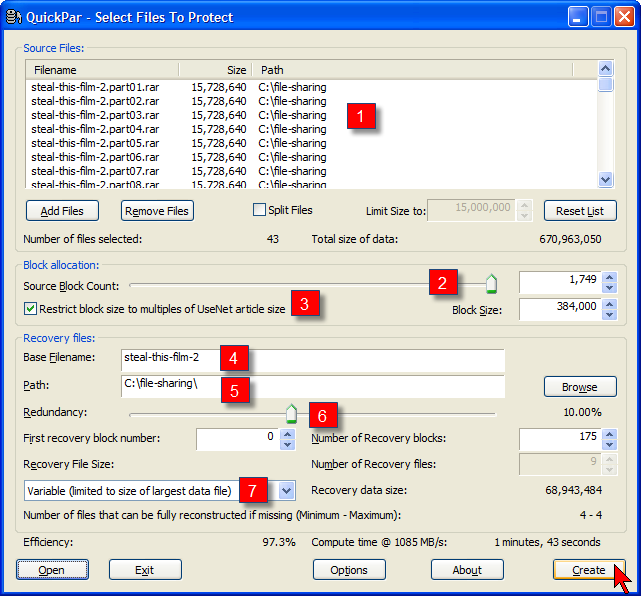
Once you have selected the files to process, you will be returned to the original window. The names of the selected files will appear in the Source Files box near the top of the window. (See the screenshot below.) At this point, you need to check that 7 important settings are specified correctly. You then click the Create button to create the PAR2 files. It looks complicated, but it really isn't, because most of the time the default values will be just fine. However, do take a moment and check the settings which I have marked in red on the screenshot, using the instructions below. |
||||||||||||||||||||||||||||
|
||||||||||||||||||||||||||||
|
Within the Source Files section of the window: 1 Filename This column contains the list of all the files that will be processed by QuickPar. Double- check that all the RAR files are listed. At the same time, make sure no other files are in the list. Within the Block allocation Files section of the window: 2 Source Block Count QuickPar will divide all the data in your files into slices, called "blocks". This setting controls how many blocks there will be. Make sure the slider is all the way to the right. If it isn't, you can move it. In our example, QuickPar is showing us that the data in the 43 RAR files we are about to process will be divided into 1,749 PAR2 blocks. 3 Restrict block size to multiples of UseNet article size When you prepare PAR2 files for Usenet fire sharing, you want to make sure the block size works well for Usenet. To do so, this setting should be checked. If there is no checkmark in the box to the left, click on the box and the checkmark will appear. Within the Recovery Files section of the window: 4 Base Filename This is what QuickPar will use for the first part of the name of all the files in generates. Make sure there are no extra characters. For example, if you were to see steal-this-film-2-part01, you would delete the last few characters to change the base filename to steal-this-film-2. 5 Path This is the path of the folder in which QuickPar will place the newly generated PAR2 files. Unless you have a good reason to do otherwise, use the same path as where the RAR files are stored. (This will probably be the default.) If you need to change the path, you do so by clicking the Browse button on the right. 6 Redundancy The redundancy value is to the right of the slider, below the Browse button. This setting controls the level of data recovery the PAR2 files will support. A higher value enables more data recovery, but requires more PAR2 files. For Usenet file sharing, a good redundancy value to use is 10.00%. This will probably be the default. If not, change the value 10.00% by moving the slider. For a finer adjustment, you can click the slider and then use the right- and left-arrow keys. 7 Recovery File Size
This setting controls the size of the PAR2
files that will be generated. For Usenet
file sharing, you should choose:
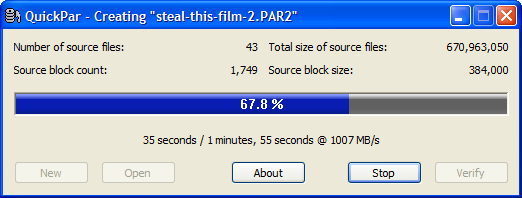
Once you have checked all the settings, start the PAR2 file generation by clicking the Create button, in the bottom right-hand corner of the window. As the PAR2 files are being generated, you will see a window showing you the progress. |
||||||||||||||||||||||||||||
|
||||||||||||||||||||||||||||
|
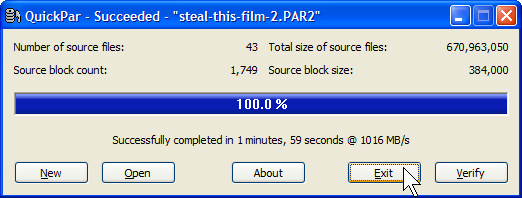
When QuickPar has finished generating all the PAR2 files, it will display a confirmation window. Before you exit, you can verify that the PAR2 files are correct by clicking the Verify button. However, you don't need to because QuickPar verifies automatically. (Still, it's free, and you might want to do it just for fun.) |
||||||||||||||||||||||||||||
|
||||||||||||||||||||||||||||
|
At this point, you are finished with QuickPar. Close the program by clicking the Exit button. In our example, QuickPar created 10 PAR2 files, which you can see in the screenshot below. 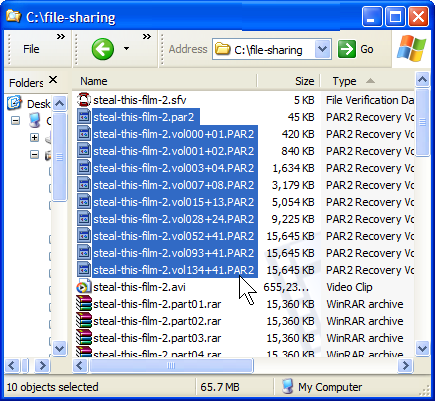
To work with NFO (information) files, I recommend the following three freeware programs: • MediaInfo — extracts technical information from media files • Cool Beans NFO Creator — creates NFO files • GetDiz — displays NFO files, especially ASCII art
MediaInfo download site:
Cool Beans NFO Creator download site:
GetDiz download site: Before you build the NFO file, use MediaInfo to get the technical information ready. (If the file you are sharing is not a media file, you can skip this step.) After you start the MediaInfo program, before you do any work, pull down the View menu and select the Tree option. This will display the information in a a hierarchical (tree-like) format that is easy to understand. 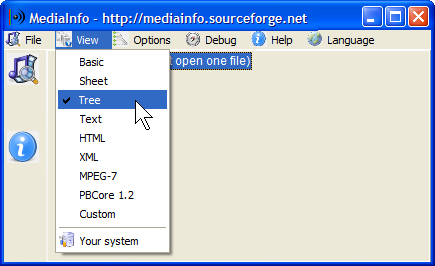
Select the media file for which you want information. Pull down the File menu, select Open and then File: 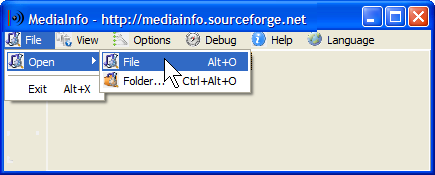
You will now see a window containing a file list. Navigate to your file sharing folder, select the media file for which you want information (in our example steal-this-film-2.avi), then click the Open button. 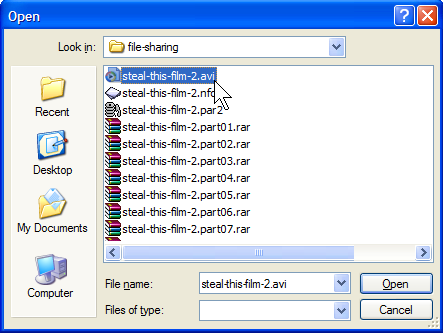
MediaInfo will now display the technical information about this file. You will use this information in a minute. 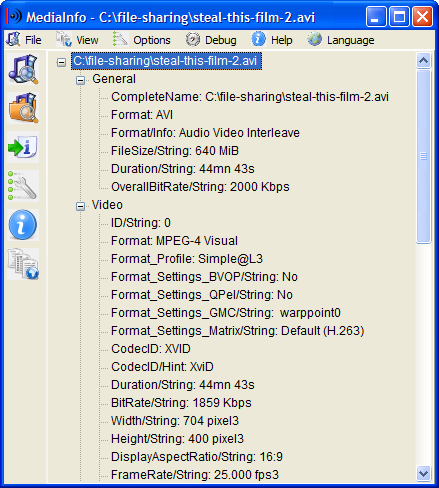
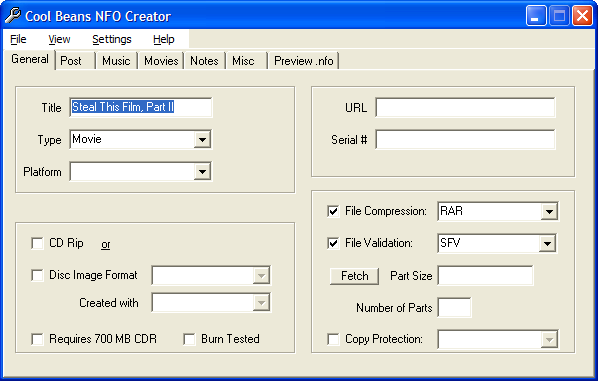
In another window, start Cool Beans NFO Creator program (see the screenshot below). Underneath the menu bar, you will see seven tabs: General, Post, Music, and so on. The idea is to click on each tab in turn, and fill in as much information as you can. You can then preview the NFO file and, if you like what you see, you save the file. Start with the General tab, and fill in whatever information you have. In our example, I have filled in the title and the type of file (a movie). I have also clicked on File Compression (selecting RAR), and File Validation (selecting SFV), to indicate that we are uploading RAR files and including an SFV verification file. |
||||||||||||||||||||||||||||
|
||||||||||||||||||||||||||||
|
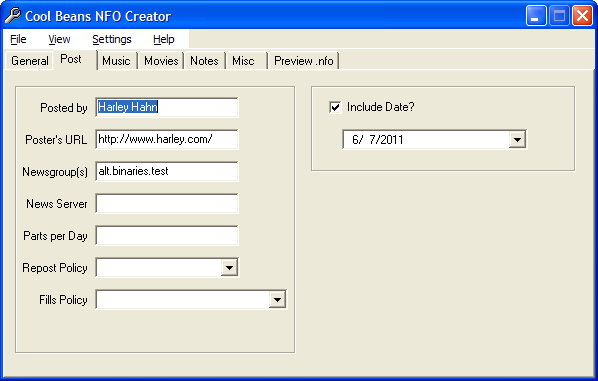
Next, click on the Post tab. This form contains information related to the uploading (posting) of the file to be shared. In our example, I have specified my name, the URL of my Web site, the date, and the newsgroup to which we are going to post the file. |
||||||||||||||||||||||||||||
|
||||||||||||||||||||||||||||
|
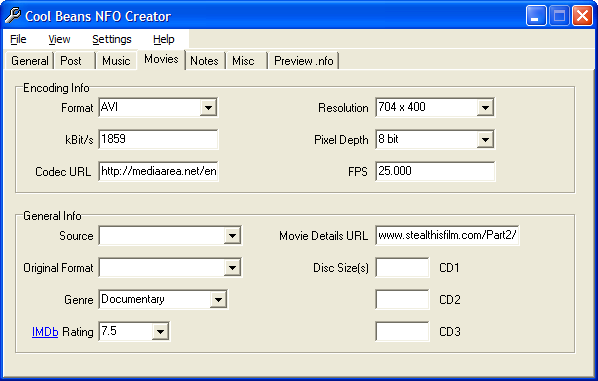
Notice that I have specified the newsgroup alt.binaries.test, a special newsgroup used only for testing. You should use the newsgroup that is most appropriate for the file you are uploading. If you are not sure which newsgroup to use, you can always post to alt.binary.boneless, a very active newsgroup used for all types of file sharing. If you are uploading music or a video, the next step is to click on the appropriate tab, Music or Movies. In the example below, I have clicked on the Movies tab because we are sharing a video. Once the form is displayed, fill in whatever information you know about the file. For a video, the Encoding Info section is especially important. The General Info section is optional, but it is nice to include as much as you can. For our sample file, I found the information for the Encoding Info by using the MediaInfo program (see the MediaInfo screenshot above). I also added two other pieces of information. First, I found the URL of the Web page that has information about the video. Second, I looked up the movie on the IMDB (Internet Movie Database) Web site, so I could specify its rating. |
||||||||||||||||||||||||||||
|
||||||||||||||||||||||||||||
|
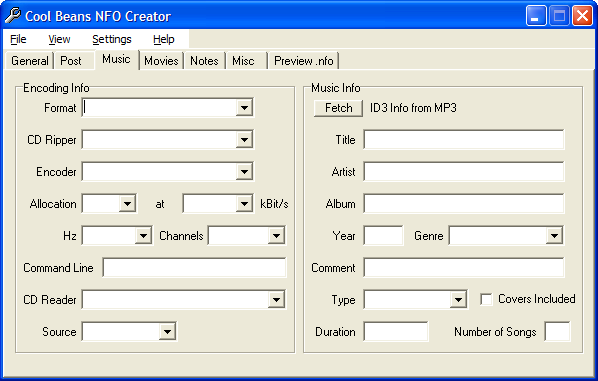
If you select the Music tab instead of the Movies tab, you will see the form below. Within the Encoding Info section, the most important information to specify is Format, kBits/s (bit rate), Hz (sampling rate), Channels , and Source (if you know it). Within the Music Info section, the most important sections are Title and Artist, but you should try to fill in as much information as you can. With an MP3 file, you can click on the Fetch button to extract information automatically from the file itself. |
||||||||||||||||||||||||||||
|
||||||||||||||||||||||||||||
|
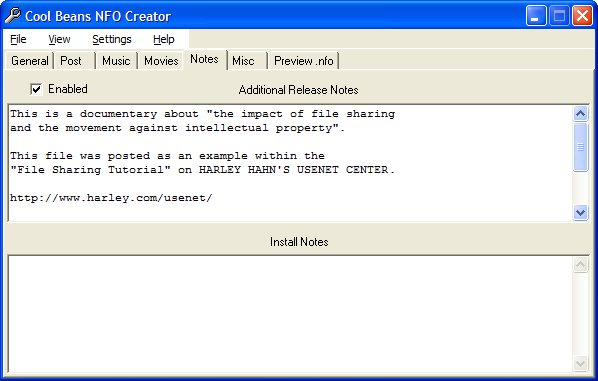
Once you have filled out the Music or Movies information, the last form to fill out is the Notes tab. This form is used to insert your own remarks to the NFO file. For our example, I decided to enter the following notes.
This is a documentary about "the impact of file sharing
To enter notes, click on the Enabled checkbox. Then type as many lines as you want. You can see part of the text in the screenshot below. Hint: If you are uploading software, make it a point to enter installation information in the Install Notes area. |
||||||||||||||||||||||||||||
|
||||||||||||||||||||||||||||
|
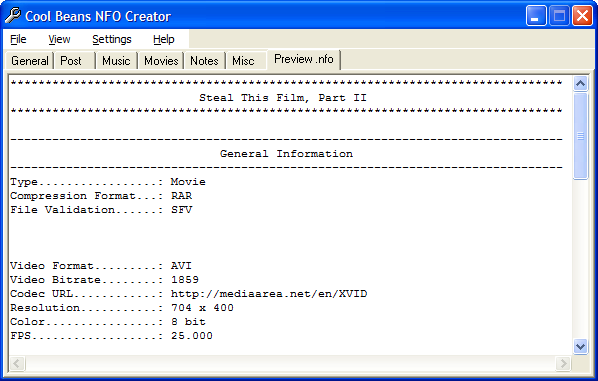
Finally, you can preview the NFO file by clicking on the Preview .nfo tab. In the screenshot below, you can see the top part of the NFO file we have just generated. |
||||||||||||||||||||||||||||
|
||||||||||||||||||||||||||||
|
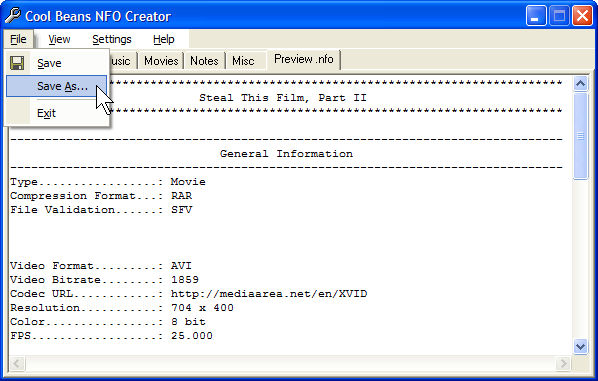
Once you are satisfied with your NFO file, you are ready to save it. Pull down the File menu and select Save As. |
||||||||||||||||||||||||||||
|
||||||||||||||||||||||||||||
|
Navigate to your file-sharing folder and save the NFO file under an appropriate name. In our case, the name is steal-this-film-2.nfo. 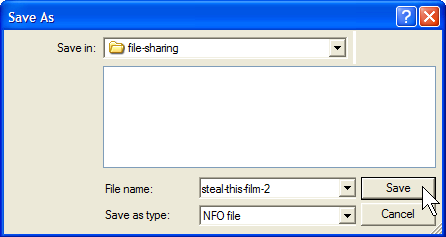
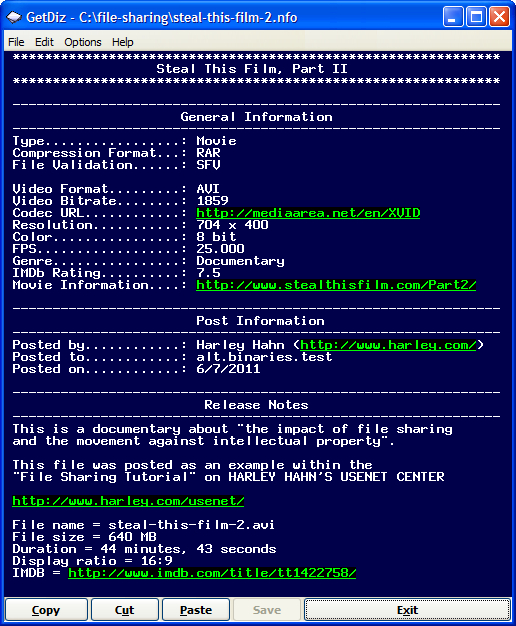
Having created an NFO file and saved it in your file-sharing folder, you can use the GetDiz program to display the entire file. The screenshot below shows you what our NFO file would look like to a user who has downloaded and displayed it with GetDiz. Note: The white-on-blue coloring you see below is the GetDiz default for displaying NFO files. The colors are not actually part of the file. |
||||||||||||||||||||||||||||
|
||||||||||||||||||||||||||||
|
At this point, our NFO file is ready. Close the three programs you just used (MediaInfo, Cool Beans NFO Creator, GetDiz).
To upload the files we have created, we will use a free Usenet posting program called Camelsystem Powerpost. In this section, I will show you how to configure the program. In next section, we will take the last step by actually uploading the files.
Camelsystem Powerpost download site:
Hint: After you navigate to the download page, you will have a choice of what to download. Choose the "setup" download in English. The first time you use Camelsystem Powerpost, you need to take a few minutes to specify the various settings the program will need to connect to your news server and post articles for you. To do so, pull down the Options menu and select Program settings. 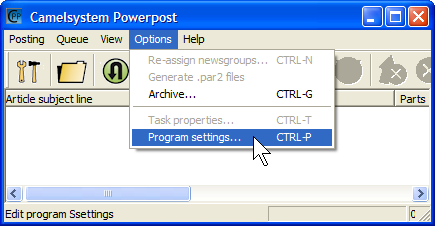
You will now see a new window called "Properties for Camelsystem Powerpost". This window will have four tabs. We will go through each tab in turn, specifying information as needed. We'll start with the Server settings tab, which you can see in the screenshot below. On this tab, you fill the information the program needs to communicate with your Usenet news server. I have marked the items you need to fill in with red arrows. (Notice the spelling mistake, by the way. Newsserver addres is missing an "s" at the end of "address".) 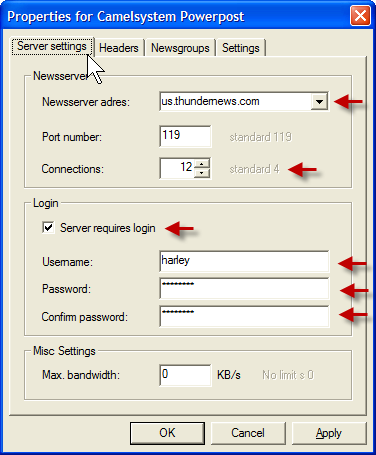
First, type the name of your news server in the top box. In our example, I have used the server for Thundernews (one of my favorite Usenet providers). Next, specify the number of connections. The default is 4; the maximum is 12. To enable the program how to log in to your account, make sure there is a checkmark next to Server requires login; then fill in your username and password. To continue, click on the Headers tab. You will see the following window. To start, enter your name and email address. If you want to remain anonymous, use a fake name and address. (Notice that, once again, the word "address" is misspelled. This time, there are two letters left out.) 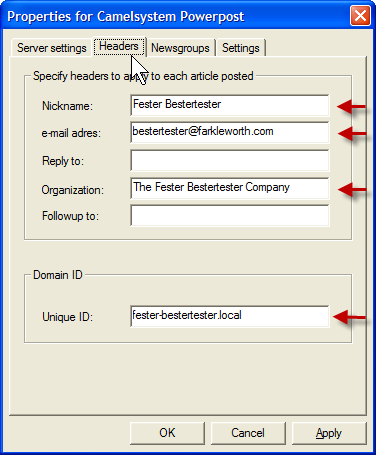
For the Organization, you can put the name of your school or company or group if you want. If you care about privacy, you can use a fake name or simply leave the space blank. Finally, you should set the Unique ID, a string of characters that will be appended to all the Message IDs the program generates, to ensure that the Message IDs are unique. The default is: camelsystem-powerpost.local It is a good idea to change the part before .local. I suggest something based on your nickname. (Do not use spaces.) In our example, I have used: fester-bestertester.local To continue, click on the Newsgroups tab. You will see the window below, which shows you a list of newsgroups. 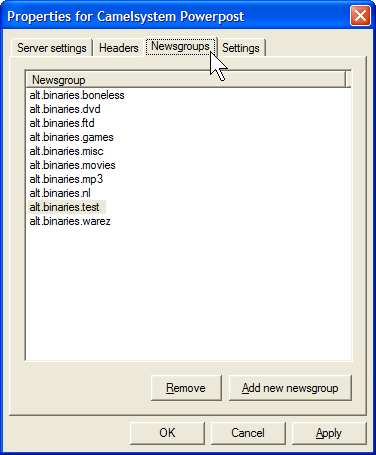
What you see here is the default list, which contains the groups you will want to use most of the time. to post (upload) to a different group, add it to the list by clicking on Add new newsgroup button. Note: alt.binaries.boneless is a catch-all, miscellaneous group used for general file sharing. As such, it is the most active of all the Usenet newsgroups, receiving more data than any other group. To continue, click on the last tab, Settings. You will see the window below, which shows you a variety of miscellaneous settings. Once you get some experience, these options will start to make sense. For now, all I will say is that, unless you have a good reason to make a change, stay with the defaults (which are what you see below). 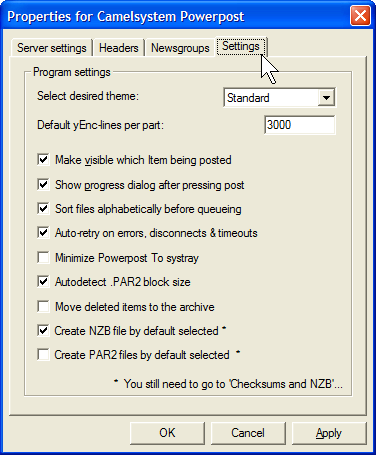
The second last setting tells the program to create an NZB file for us automatically. The last setting tells the program to not create PAR2 (error correction) files. We don't need PAR2 files because we used QuickPar to create our own files. If you want, Camelsystem Powerpost will create PAR2 files for you and, indeed, some people choose to do so. However, I advise against it. Creating your own files gives you more control over the process. Moreover, it allows you to check and verify the PAR2 files before they are posted. You can now click on the OK button to close the Properties window and return to the main window. Once you specify the program settings, they are stored permanently, so there is no need to enter this information again unless something changes. From now on, whenever you run Camelsystem Powerpost, you can immediately jump to the next step: posting your files to Usenet.
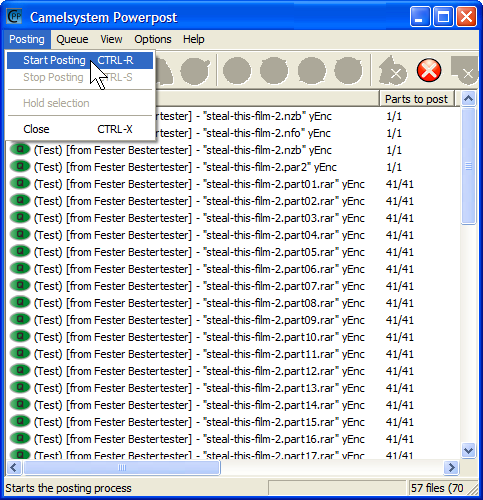
Once you have specified the program settings, you are ready to select the files you want to post (upload). To do so, pull down the Queue menu and select Add files to queue. (The "queue" is the list of files to be posted.) 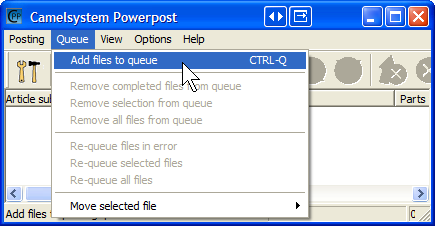
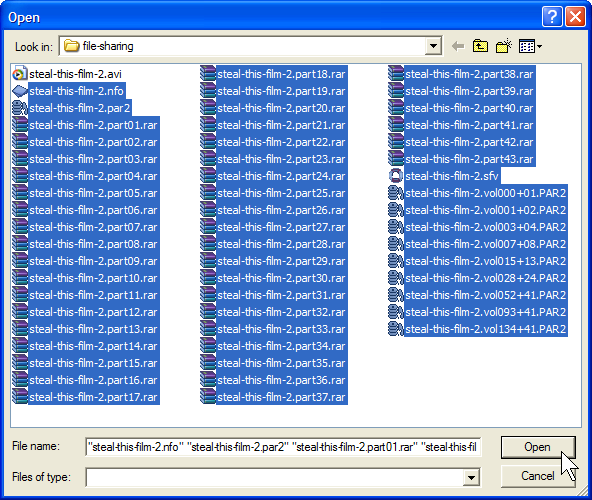
A new window will appear to enable you to select the files to be uploaded. Simply navigate to the folder that holds your files, and select what you want. In the example below, you will notice that I have selected all the files in the folder except the original AVI file. This is important: Do not select your original file if it happens to be stored in the same folder as the files you have generated. What you want to select are the NFO, PAR2, RAR and SFV files. (The reason you don't see the NZB file is because it has not yet been created. This will be done automatically by the Camelsystem Powerpost program.) |
||||||||||||||||||||||||||||
|
||||||||||||||||||||||||||||
|
Once you have selected the files to be uploaded, click the Open button. You will now specify a few choices and specifications needed before the posting process begins. You will see a window like the one below. In our example, you can see on the title bar that we have just added 55 files to the queue. (File #56 is the NZB file that has yet to be created.) This window has four tabs. We'll start with Subject. 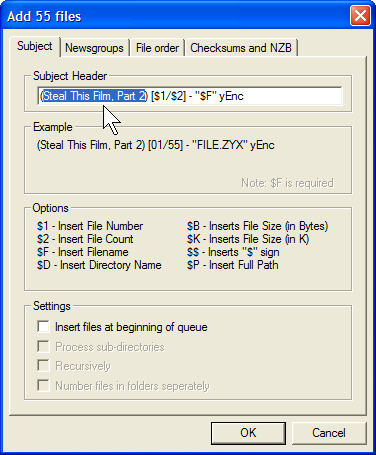
The Subject tab contains information that will be used the create the Subject lines for the files that are about to be posted. Specifically, you need to specify the "Subject Header". The first time you use the program, you will see a default value like the one shown below. 
Most of the Subject Header is filled in for you automatically. All you need do is replace the four question marks within the parenthesis, by typing a descriptive name. In our example (see the screenshot above), I typed Steal This Film, Part 2. Notice that I left the parentheses intact. This is important. Important: Do not change the rest of the Subject Header unless you know what you are doing and have a good reason to override the default. Once you have specified the Subject Header, click the Newsgroups tab. You will see a window like the one below. At this point, you need to specify the Usenet newsgroup to which you want to post your files. 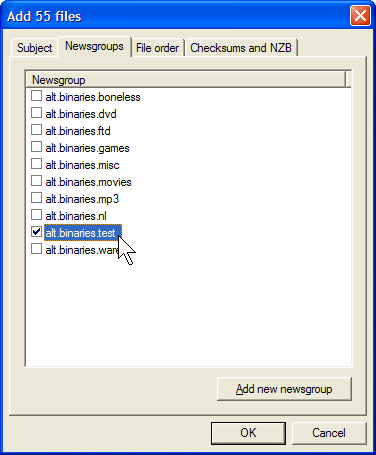
To help you choose the right group, you can use the table below. I have included the groups in the list above, as well as several others that are particularly popular. If you want to post to a group that is not in the default list, you can add it for yourself. (Notice the Add new newsgroup button in the screenshot above.) Notice that I have not included alt.binaries.ftd and alt.binaries.nl. These two groups are of interest only to users from the Netherlands. The reason they are included in the default list is that Camelsystem Powerpost is maintained by Dutch programmers. Popular File Sharing Newsgroups
Once you have specified the Subject Header, click on the File Order tab. You will see a window like the one below. This window allows you to modify the exact order in which the files will be posted to your Usenet server. 
For two reasons, I recommend you move the NFO file and SFV file to the top of the list, which will cause them to be uploaded before the data files. First, even before all the files are fully uploaded (which can take a long time), people will be able to download your NFO file and see what you are sharing. If they like it, they can use your NZB file to initiate a download. Second, once people have your SFV file, they can use it to verify that correctness of the data files as they arrive, one at a time. (Downloading large files is a slow process.) Note: As we will see in a moment, when the NZB file is generated, it will be inserted automatically above all the other files. To continue, click on the checksums and NZB tab. This will display a window that allows you to specify whether or not you want the program to create SFV, PAR2 or NZB files. 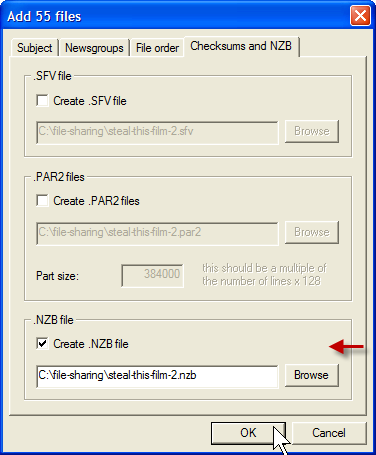
In our case, we already have the SFV and PAR2 files. However, you will always need the program to create an NZB file for you, so make sure that this box is checked (see the red arrow). Your preparation is now complete. Click the OK button to return to the main window. Then pull down the Posting menu, and select Start Posting. Notice that the NZB file has been created for us: it is at the top of the list. |
||||||||||||||||||||||||||||
|
||||||||||||||||||||||||||||
|
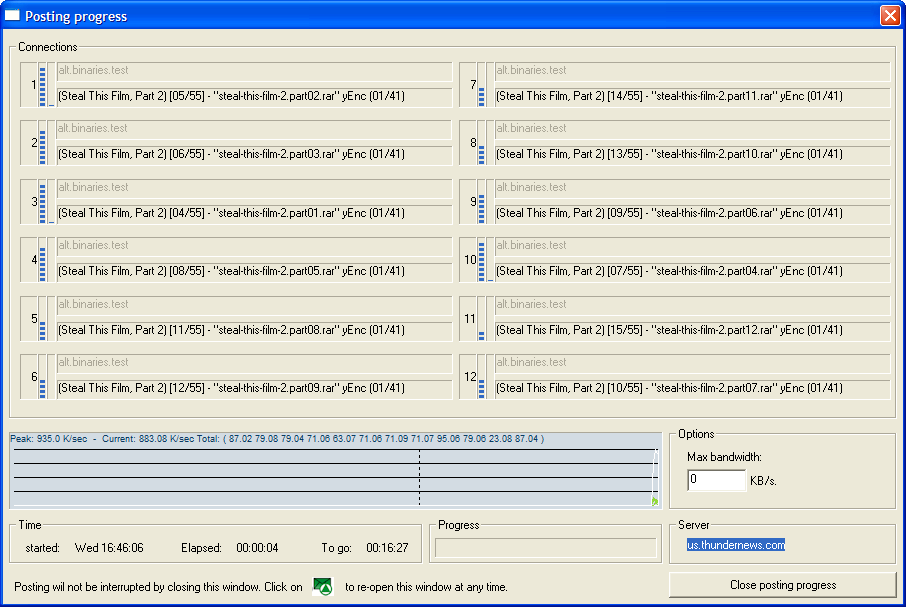
As soon as the posting begins, the program will display a large window called "Posting Progress". Within this window, the program shows you information about each of the various files currently being uploaded. In our example (below), 12 files are being uploaded at the same time. This is because, within the program settings, we specified we wanted the maximum 12 connections. If you are trying to work at the same time and your computer is slowed down too much, you may have to lower the number of connections. |
||||||||||||||||||||||||||||
|
||||||||||||||||||||||||||||
|
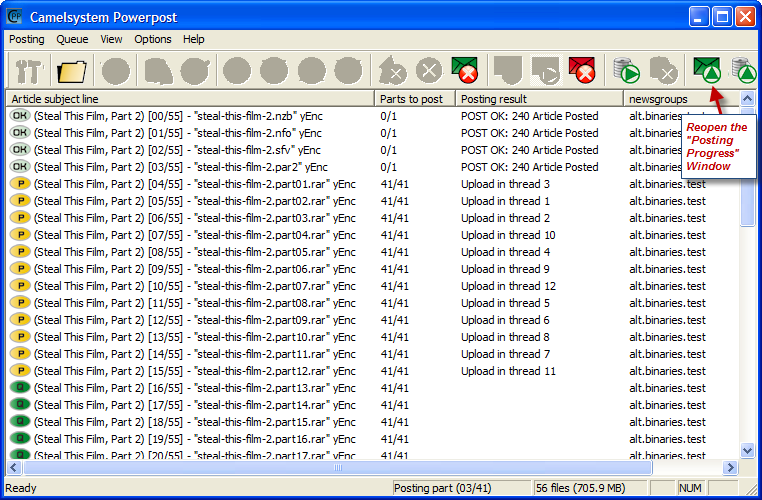
Since uploading the files can take a while, you will probably want to close this window. (Just click on the "X" in the top right-hand corner of the window.) You will then be returned to the main window, where you will see a list of all the files, along with a summary. You can reopen the "Posting Progress" window whenever you want by clicking on the green envelope with the green triangle near the top-right of the window. (See the screenshot below.) In the example below, you can see that the first 4 files have uploaded successfully (NZB, NFO, SFV, and PAR2 info); the first 12 PAR2 files are currently being uploaded; and the rest of the files are waiting in the queue. If you want to do other work while the files are uploading, do not close this window as it will stop the program. Instead, minimize the window to shrink it out of the way. The program will continue working silently in the background. (See the hint below.) |
||||||||||||||||||||||||||||
|
||||||||||||||||||||||||||||
|
— hint — If you minimize the Camelsystem Powerpost window, the program will disappear, but will keep running in the background. Just click on the Minimize button near the top right-hand corner of the window. 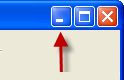
To be as unobtrusive as possible, the program will not minimize to the task bar, where it might get in your way. Instead, you will see a small icon in the area to the right of the task bar (see below). In Windows 7, this area is called the Notification Area; in Windows XP, it is the System Tray. 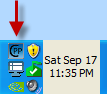
To reopen the window, all you have to do is click on this icon. In my experience, the icon is sometimes a bit hard to see, so here is an enlarged picture, so you know what to look for. 
At this point, your work is done. All you have to do is wait for Camelsystem Powerpost to finish uploading your files to the Usenet server. Once all the uploading is finished, your postings will begin to propagate from one Usenet server to another and, within a short time, your files will be available to Usenet users around the world.
© All contents Copyright 2026, Harley Hahn
|
||||||||||||||||||||||||||||